RECORDS OF EMPLOYMENT
DESCRIPTION
This module allows the user to browse/add/amend Records Of Employement (ROE). An export routine can export the ROE's to a file which can then be printed by the HRDC's ROE Laser printing program.
An option on the menu (HRDC How-To PDF) is available as a link to an Adobe Acrobat PDF document created by HRDC which describes how to fill-out an ROE. This option requires that you have Adobe's Acrobat Reader on your workstation. If Acrobat is not installed you should contact your system administrator to get it installed. The document name can be set on the defaults page and the document must be in the directory where the payroll manual resides.
ROE PAGE
The ROE Page shows the ROE information. When adding a new roe you will be forced to this screen if it is not currently displayed.
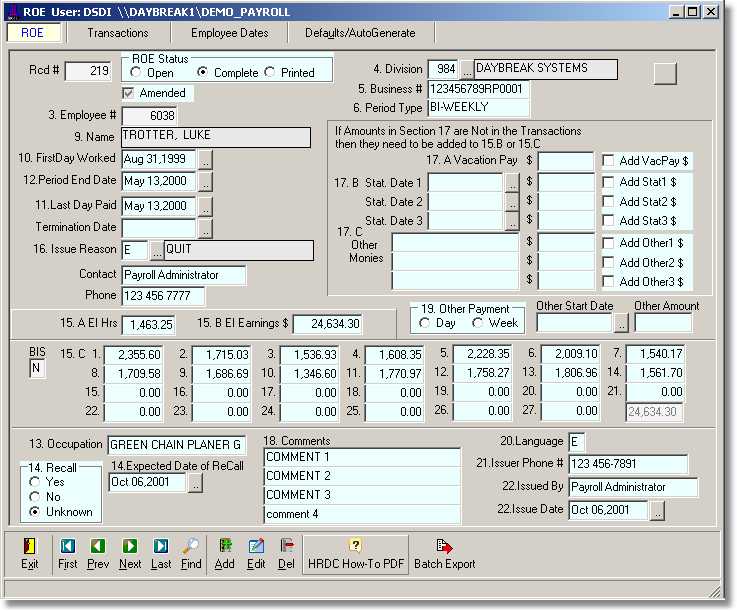
Browsing ROE's
When the ROE program is started it loads a list of any ROE's created to-date. Using the First/Prior/Next/Last buttons allows you to browse through the list (in it's current sorted order). Clicking the 'Find' button will display the list where you can locate a specific ROE by any of the columns. If you change the sort order (by clicking on a column title) then that is the order that the First/Prior/Next/Last will use while browsing.
Adding a New ROE
-
Click the ADD button on the menu at the bottom of the screen and the employee list will be displayed. Find the employee that you want to make the ROE for and click accept to proceed or click cancel to quit the add routine.
When the employee has been selected the ROE screen will be cleared and a new record will be displayed with the defaults (see below).
-
The First Day Worked is set automatically by the program using the following logic:
- If the employee's pay information record has a ROE Ending date from a prior ROE then the program scans the time transactions starting at the day after the Ending date and looks for the first transaction whose pay code is flagged as having EI Earnings or EI Hours. If a transaction is found then it's date is used as the ROE's 'First Day Worked' else the 'First Day Worked' is set to the day after the Last Ending date.
- If the employee does not have a prior ROE Ending date then the employee's Plant date is used if it is valid.
- If the employee's Plant date is invalid then the employee's Company date is used.
- If the Company date is invalid you will need to manually enter the appropriate date.
After the 'First Day Worked' and the 'Period Ending Date' are entered the program will scan the time transactions to total the EI Hours and Amounts for the time frame. Re-entering either date will trigger the program to re-total the transactions.
When entering the 'Period Ending Date' you may see the following message:
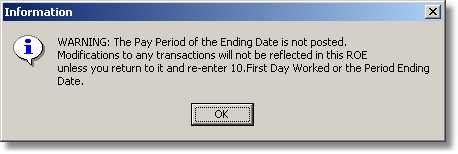
This is only a warning to alert you to the fact that some of the time transactions used for the ROE have not been posted to a pay record yet and could possibly be changed. If transactions are changed after the ROE has been created then the ROE will not automatically adjust it's totals and you will be required to re-enter either the 'First Day Worked' or the 'Period Ending Date' in order to re-total the transactions. You may want to complete your pay run before creating ROE's or create a Manual PayRecord for the employee(s) involved.
The 'Roe Status' field should be set to 'Complete' if it is to be finalized and you want to make the ROE available for printing/exporting.
Note: When this document refers to Printing it also refers to exporting as the act of exporting implies that it will be printed.
When set to Complete the program will update the employee's ROE information which can be viewed in the Dates screen (shown below) or in the employee maintenance module pay-info screen. After a ROE has been printed/exported this field is set to 'Printed'. Should you have problems printing you may return to this screen and set the status back to 'Completed' and then re-print the ROE. The 'Open' status indicates that the ROE is not finalized. For example: You may elect to add an ROE record, save it and at a later point in time edit it and fill in the First Day Worked and/or the Period Ending dates which will cause the program to recalculate the amounts.
When done filling in all the information required for the employee Click the ACCEPT button to save the ROE. If a 'Termination Date' has been entered you will be prompted as to wether you want the program to set the employee's Status to 'T'erminated. Select Yes or No as desired.
ROE TRANSACTIONS SCREEN
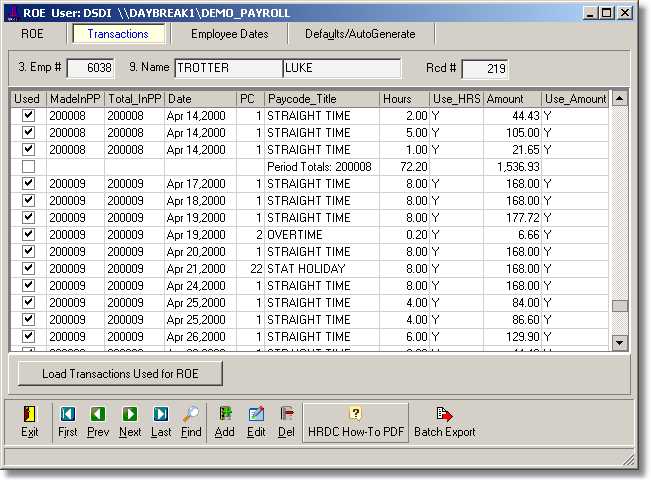
The Transactions screen shows the transactions within the ROE's time frame and indicates which hours/amounts are used for the ROE's totals. This screen will show data when you add a new ROE but will not automatically show the data when you are browsing the ROE's as the query it executes can be very time-consuming. Should you wish to view the transactions while browsing, click the 'Load Transactions for ROE' button at the bottom of the grid.
EMPLOYEE DATES SCREEN
This screen is for information purposes only. It displays the employee's current status and related dates. When adding/editing a ROE the right-hand list will display information as to how the ROE was calculated.

ROE DEFAULTS SCREEN
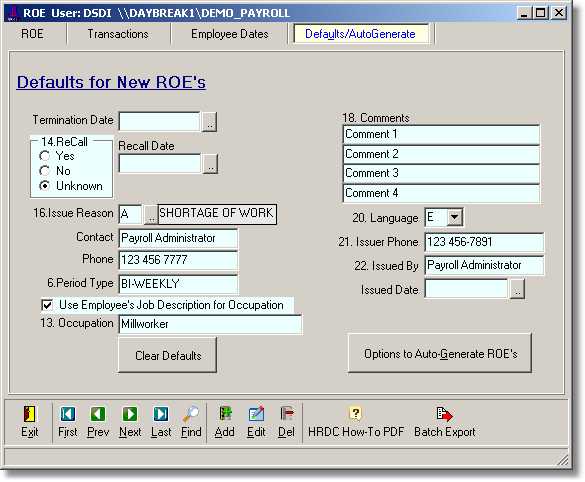
The Default Settings screen allows the user to enter default values for selected fields that would be applicable to the majority of employees. When adding a new ROE these fields are transferred to the new ROE record where they can then still be changed if required. This option is especially useful if doing bulk lay-offs. This screen also has an option to Auto-generate ROE for multiple employees at once.
AUTO-GENERATE ROES SCREEN
Click on the 'Options to Auto-Generate ROE's' button on the Defaults Screen.
This screen allows the user to set the criteria for selecting employees to auto-generate ROEs for. When the Accept button is clicked the program will generate ROE's for the selected employees using the default settings. The user can then review the ROE's and make any adjustments that may be required on an individual basis.

EXPORTING ROES for Printing
After you have entered the ROE(s) and are ready to print them then:
Click on the 'Batch Export' button on the bottom menu and the following screen will appear.
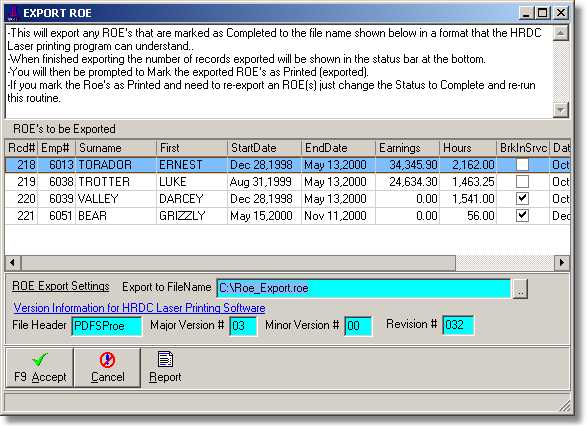
The above screen lists the ROE's that will be exported to the Filename shown towards the bottom of the screen. If there is no Filename entered then enter one. If you will be printing using HRDC's Laser printing program then the Filename should have an extension of .roe and the Version Information should be filled in. The version information can be obtained from HRDC if it is not already set. Note: Remember the path and filename as you will need it when you run the HRDC Laser printing program.
If you click the Accept button the export file will be generated and the status bar will indicate how many ROE records were exported. You will then be prompted to mark the ROE's as printed (exported). Normally you would select 'Yes' and the program will update the status of the ROE's to 'Printed'. If you need to re-print/re-export ROE(s) you can change the status back to 'Complete' and re-run the export routine.


